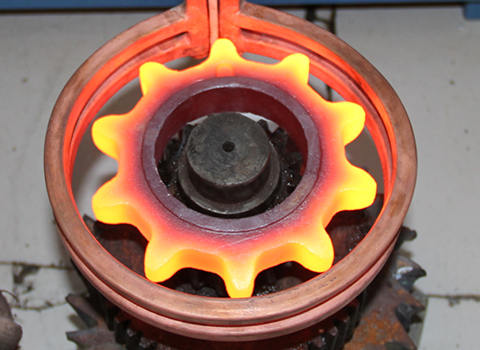
Intermediate frequency heat treatment process of compressor speed-increasing gear:
The speed-increasing gear is a key transmission part in the screw compressor. The working speed is 2000~4000r/min, and the matching motor power is 90~250kW. This type of gear is divided into two types: gear shaft (length 250~350mm) and gear with inner hole. The gear tooth width is 50~70mm, the maximum radial size of the gear teeth is 150~385mm, the module m=3, the gear accuracy is level 6, and it is made of 20CrMnTi steel. The drawing design requires the surface hardness of the gear teeth to be 54-60HRC and the core hardness to be 35-40HRC.
This type of gear that was originally purchased from an outsourced gear broke and failed during use. According to inspection and analysis, the reasons were insufficient hardness at the root of the tooth and the presence of network carbides in the infiltration layer. For this purpose, a medium frequency induction heating furnace is used for quenching heat treatment.
The technological process of this type of gear is forging→normalizing→rough machining (forming)→carburizing→normalizing→semi-finishing→quenching and tempering→finishing→flaw detection.
Heat treatment process: The first normalizing is preparatory heat treatment, which is mainly to facilitate the cutting of forging blanks. The second normalizing is to completely eliminate the reticulated cementite in the carburized layer to avoid grinding cracks during grinding and improve the performance of the gear. Oil cooling is used during quenching. According to the shape and size of the gear, the oil is quenched horizontally or vertically along the gear axis to reduce quenching deformation. Check the hardness of the gear after quenching and tempering. The surface of the gear teeth is 54~60HRC and the core is 35~40HRC. The metallographic structure of the gear consists of fine tempered martensite + granular carbide from the surface to the inner layer, the secondary layer is needle-like tempered martensite, and the core is tempered sorbite + ferrite. The depth of the hardened layer is 1.0~1.3mm. The deformation in the length direction of the common normal line of the gear is ≤0.03~0.07mm. All the above items meet relevant standards and drawing design requirements. More than 100 sets of gears were treated with the above heat treatment process. After processing and inspection, none of the gears had cracks or deformation, and the metallography and hardness also met the requirements.


 en
en  cn
cn  jp
jp  ko
ko  de
de  es
es  it
it  ru
ru  pt
pt  vi
vi  th
th  pl
pl 


 GS-ZP-1200


