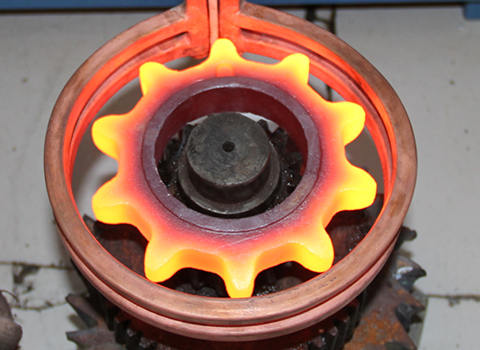
The bearing ring of a rolling mill bears a pressure of 400kN and a speed of 130r/min, and is made of GCr15 steel. The heat treatment process is: heating austenitization at 860°C, austenitizing at 230°C for 4h, and secondary tempering at 150°Cx3h after rough grinding. The structure after austempering is: lower bainite (volume fraction 60%-70%) + tempered martensite + uniformly distributed carbides, hardness ≥ 63HRC. For these heat treatments, we often use a medium-frequency induction heating power supply, but during production, it was found that orange-peel-like tissue defects appeared on the outer surface of the ferrule, resulting in failure of the workpiece.
The inspection found that orange peel defects formed on the ring roller table. Microscopic observation found that the grains of the structure were coarse, the grain boundaries were oxidized into black nets, some grain boundaries were melting, and angle-shaped holes appeared. At the same time, it was found that carbides gathered under the orange peel, and the hardness dropped to 54HRC at 2mm from the surface of the orange peel. . This indicates that a decarburization layer appeared on the surface, and multiple cracks were found in the orange peel area and extended to the matrix. According to the preliminary analysis, the orange peel and decarburization defects are caused by overheating on the surface of the workpiece. Metallographic observation found that part of the workpiece material exceeded the standard of aluminum oxide and was rated as level 3-3.5, the carbide network was level 2, the carbide liquid precipitation was level 1.5-2, and the carbide banding was level 3-3.5. The structure of the workpiece after heat treatment is uneven. The typical structure is: acicular martensite zone + tempered martensite + lower bainite (volume fraction 20%-30%) + black troostite network + retained austenite + carbide.
According to the analysis, when the ingot is solidified, the eutectic carbides form dendritic segregation, which is called liquid segregation, and the dendritic carbon content is relatively high, and (Fe, Cr)3C+(Fe, Cr)7C3A ternary eutectics appear locally. The forging of the workpiece breaks the eutectic skeleton, and some eutectic carbides remain in the form of liquefaction. Insufficient forging makes the liquefaction exceed the standard, which causes the workpiece to be prone to overburning defects. On the other hand, after the workpiece is heated to 860 °C, the alloying degree of austenite in the carbide band zone is relatively high, while the degree of austenite alloying in the non-carbide band zone is low. Insufficient diffusion and low austenite homogenization lead to inconsistent isothermal transformation times. The workpiece is at 230°C isothermal, some areas: A-M (most of them), and some areas under A-B. Due to the large size of the workpiece, it takes a long time at the beginning of the isothermal, and the cooling is slow, so that the workpiece forms a group of flocculent trostite, and the workpiece has quenching soft spot defects. During the tempering of the workpiece, martensite is formed again, which expands the size and increases the deformation tendency of the workpiece. In addition, there are tempered martensite and untempered martensite in the tempered structure, and there is lower bainite with a volume fraction of 20%. The structure is not uniform, which causes the internal stress to rise. When the internal stress is greater than the yield limit of the workpiece, the workpiece will be warped and deformed, and the roundness of the ferrule will exceed the standard. Due to the excessive friction of the roller table during the operation of the roundness exceeding the standard ring, if there is oil shortage or insufficient oil supply and overloaded working conditions at the same time, it is easy to generate friction and heat. When its temperature reaches or exceeds the pseudo-eutectic temperature of 1080°C, the workpiece will be over-burned.
Based on the above analysis, the defects of GCr15 steel ferrule include: 1.5-2 grade carbide liquefaction in the structure, uneven structure after forging, pseudo ternary eutectic structure with low melting point in the liquefaction zone when the workpiece is quenched and heated; The final structure is uneven, the amount of martensite is too high and the amount of lower bainite is insufficient, the size of the workpiece expands and the internal stress increases, resulting in the roundness of the workpiece exceeding the standard, which intensifies the friction during the operation of the ferrule, resulting in over-burning and decarburization of the workpiece surface Invalid.
In order to prevent the above defects and failures, the process improvement is as follows:
1) Forging heating should keep the furnace temperature uniform. After forging, the carbides should be evenly distributed and the structure after forging should meet the technical standards.
2) The temperature of the heat treatment heating furnace should be kept uniform. The charge should be placed so that the temperature of the workpiece is uniform to prevent uneven austenitization of the workpiece, which will lead to uneven structure and excessive stress after heat treatment, causing severe friction, overburning and decarburization failure of the workpiece during operation.。
3) Use medium-frequency induction heating power for isothermal heat treatment, striving to achieve uniform temperature, uniform and stable tissue transformation and formation, without causing large stress and deformation, as well as the resulting over-burning phenomenon caused by excessive friction of the workpiece.
The workpiece is affected by many factors during the heat treatment process, and some defects will inevitably occur. Therefore, it is necessary to master the preventive measures for common defects. This article briefly analyzes the causes of defects in bearing rings and their process improvements. The editor hopes that you can apply what you have learned to your work.


 en
en  cn
cn  jp
jp  ko
ko  de
de  es
es  it
it  ru
ru  pt
pt  vi
vi  th
th  pl
pl 


 GS-ZP-1200


